Fudgy Mini Heart Cake Pops
Highlighted under: Sweet Treat Creations
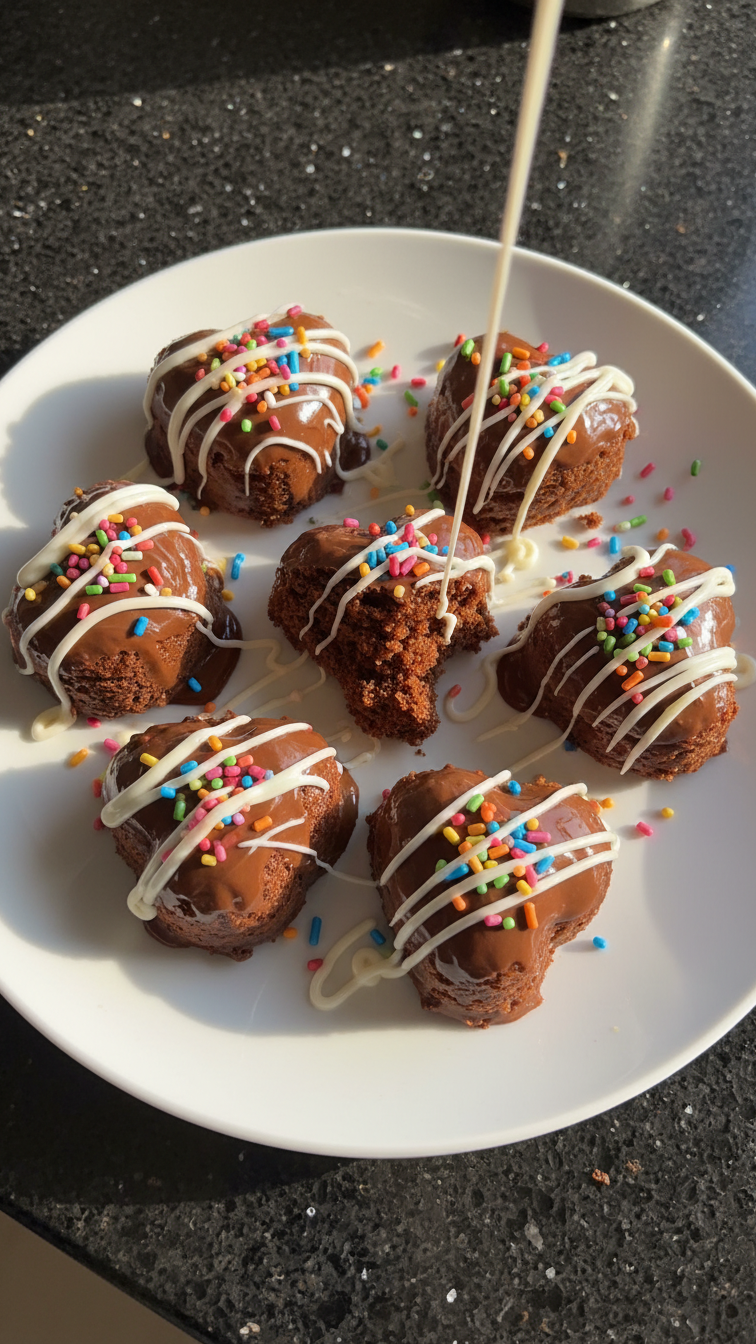
I absolutely love making these Fudgy Mini Heart Cake Pops for any occasion! They’re perfect for parties, anniversaries, or simply as an indulgent treat. The combination of rich chocolate cake mixed with creamy frosting and coated in smooth chocolate creates a delightful dessert that is sure to impress. I especially enjoy their bite-sized nature, making them a fun treat for all ages. Plus, with the heart shape, they add a personal touch that makes giving and receiving these pops even sweeter!
As I experimented with different cake recipes, I found the secret to achieving the perfect fudgy texture lies in using high-quality cocoa powder and ensuring not to overmix the cake batter. This method led to a rich flavor that stands out, especially when paired with a silky chocolate coating. It’s essential to let the cake cool properly before crumbling it for the pops, or else it can become too moist.
Another tip I discovered is to use a thick candy coating to envelop the pops. This not only adds a glossy finish but also helps hold everything together beautifully. When decorating, I love using colorful sprinkles to make each heart pop unique and enticing, making these treats almost too pretty to eat!
Why You'll Love These Cake Pops
- Rich chocolate flavor that satisfies any sweet tooth
- Cute heart shape that adds a romantic touch
- Perfect for sharing at parties or special occasions
Achieving the Perfect Cake Texture
The texture of your Fudgy Mini Heart Cake Pops is vital for the overall success of the dessert. To ensure a moist and fudgy cake, be careful not to overmix the batter once you combine the wet and dry ingredients. Overmixing can lead to dense, rubbery cake. Once you've layered in the buttermilk and dry mix, stop mixing as soon as you don't see any dry flour; this will help maintain the lightness of the cake.
When baking, keeping an eye on the oven temperature is crucial. Ovens can often run hotter or cooler than their set temperature, which can lead to uneven baking. To test if your cake is done, insert a toothpick into the center; it should come out clean or with just a few moist crumbs attached. If it comes out wet with batter, give it a few more minutes in the oven.
Perfecting the Frosting
The frosting plays a significant role in both flavor and texture. Using softened butter is essential for achieving a light and airy consistency. It should be soft enough to easily blend with the sugar but not overly melted. This will ensure that the frosting can hold shape when mixed with the cake crumbles and is smooth enough for easy coating of the cake pops later.
If you want to experiment with flavors, try adding a splash of espresso or almond extract to the frosting for an extra layer of taste. Another option is to swap half the cocoa powder for a flavored powder like raspberry or orange for a fruity twist. This simple change can elevate your cake pops into something truly unique and delightful.
Decoration and Presentation Tips
Sprinkles are not just for looks; they can add additional texture and a burst of flavor to your cake pops. Choose from a variety of sprinkle shapes and colors to match your occasion, whether that’s classic rainbow or elegant gold. To help the sprinkles stick, make sure to apply them immediately after coating the pops in chocolate while it’s still wet; otherwise, they won’t adhere properly.
Once you've coated and decorated your cake pops, consider displaying them on a decorative stand or in a container filled with rice or Styrofoam to keep them upright. This not only makes for a beautiful presentation but also ensures they stay intact while they set and harden completely. Allow them to sit at room temperature for about 30 minutes to let the chocolate harden fully before serving.
Ingredients
For the Cake Pops
- 1 cup all-purpose flour
- 1/2 cup cocoa powder
- 1 cup sugar
- 1/2 cup unsalted butter, softened
- 2 large eggs
- 1 teaspoon vanilla extract
- 1/2 cup buttermilk
- 1 teaspoon baking powder
- 1/2 teaspoon baking soda
- 1/4 teaspoon salt
For the Frosting
- 1/2 cup unsalted butter, softened
- 2 cups powdered sugar
- 1/4 cup cocoa powder
- 2 tablespoons milk
- 1 teaspoon vanilla extract
For the Coating
- 1 cup chocolate melting wafers
- Sprinkles for decoration
Instructions
Bake the Cake
Preheat your oven to 350°F (175°C). In a large bowl, cream together the softened butter and sugar until light and fluffy. Add the eggs one at a time, mixing well after each addition. Stir in the vanilla extract. In a separate bowl, mix the flour, cocoa powder, baking powder, baking soda, and salt together. Gradually add the dry ingredients to the butter mixture, alternating with the buttermilk. Mix until just combined. Pour into a greased cake pan and bake for 25-30 minutes or until a toothpick comes out clean.
Prepare the Frosting
While the cake is baking, make the frosting by beating the softened butter until creamy. Gradually add the powdered sugar and cocoa powder, mixing well. Add milk and vanilla extract, beating until smooth and creamy. Set aside.
Crumb the Cake
Once the cake has cooled completely, crumble it into a large bowl. Mix in the frosting until the mixture holds together but is not too wet. This will help you easily form the pops.
Form the Cake Pops
Scoop out portions of the cake mixture and form small balls. Stick a lollipop stick into each ball and place them on a baking sheet. Refrigerate for at least 30 minutes to firm up.
Coat with Chocolate
Melt the chocolate melting wafers according to package instructions. Dip each cake pop into the melted chocolate coating, letting the excess drip off. Place back on the baking sheet and decorate with sprinkles before the chocolate hardens.
Pro Tips
- For best results, make sure your butter and eggs are at room temperature before starting the recipe. This ensures a smoother batter and better texture. Also, using quality chocolate for the coating will enhance the overall flavor!
Storage and Make-Ahead Tips
If you're planning to make these cake pops in advance, they can be stored in an airtight container in the refrigerator for up to a week. Just make sure they are completely cooled and the chocolate coating is set before placing them in the container to prevent any sticking.
For longer storage, you can freeze the uncoated cake balls for up to three months. Simply place them on a baking sheet and freeze until solid, then transfer them to a zip-top bag. When you're ready to use them, let them thaw in the fridge before coating them with chocolate.
Troubleshooting Common Issues
If your chocolate coating is not smooth, it may be too thick; try adding a small amount of vegetable oil or shortening to thin it out. This will help create a glossy finish. Dip the pops quickly in the chocolate to avoid having them fall apart, especially if they are still warm.
In case your cake pops start to crumble or fall apart while forming, it may indicate that the mixture is too dry. Mix in a little more frosting until the mixture holds together better. Conversely, if the mixture is too wet, a slight addition of cake crumbs can help bind it better.
Questions About Recipes
→ Can I use store-bought cake for these pops?
Yes, you can use store-bought cake. Just crumble it and mix with frosting as directed.
→ How do I store the cake pops?
Keep them in an airtight container in the refrigerator for up to a week.
→ Can I freeze cake pops?
Absolutely! Freeze them before coating and store in an airtight container for up to 3 months.
→ What can I use instead of buttermilk?
You can make a buttermilk substitute by adding 1 tablespoon of lemon juice or vinegar to regular milk.
Fudgy Mini Heart Cake Pops
Created by: The Dishesbyolivia Team
Recipe Type: Sweet Treat Creations
Skill Level: Intermediate
Final Quantity: 24 pops
What You'll Need
For the Cake Pops
- 1 cup all-purpose flour
- 1/2 cup cocoa powder
- 1 cup sugar
- 1/2 cup unsalted butter, softened
- 2 large eggs
- 1 teaspoon vanilla extract
- 1/2 cup buttermilk
- 1 teaspoon baking powder
- 1/2 teaspoon baking soda
- 1/4 teaspoon salt
For the Frosting
- 1/2 cup unsalted butter, softened
- 2 cups powdered sugar
- 1/4 cup cocoa powder
- 2 tablespoons milk
- 1 teaspoon vanilla extract
For the Coating
- 1 cup chocolate melting wafers
- Sprinkles for decoration
How-To Steps
Preheat your oven to 350°F (175°C). In a large bowl, cream together the softened butter and sugar until light and fluffy. Add the eggs one at a time, mixing well after each addition. Stir in the vanilla extract. In a separate bowl, mix the flour, cocoa powder, baking powder, baking soda, and salt together. Gradually add the dry ingredients to the butter mixture, alternating with the buttermilk. Mix until just combined. Pour into a greased cake pan and bake for 25-30 minutes or until a toothpick comes out clean.
While the cake is baking, make the frosting by beating the softened butter until creamy. Gradually add the powdered sugar and cocoa powder, mixing well. Add milk and vanilla extract, beating until smooth and creamy. Set aside.
Once the cake has cooled completely, crumble it into a large bowl. Mix in the frosting until the mixture holds together but is not too wet. This will help you easily form the pops.
Scoop out portions of the cake mixture and form small balls. Stick a lollipop stick into each ball and place them on a baking sheet. Refrigerate for at least 30 minutes to firm up.
Melt the chocolate melting wafers according to package instructions. Dip each cake pop into the melted chocolate coating, letting the excess drip off. Place back on the baking sheet and decorate with sprinkles before the chocolate hardens.
Extra Tips
- For best results, make sure your butter and eggs are at room temperature before starting the recipe. This ensures a smoother batter and better texture. Also, using quality chocolate for the coating will enhance the overall flavor!
Nutritional Breakdown (Per Serving)
- Calories: 120 kcal
- Total Fat: 6g
- Saturated Fat: 3g
- Cholesterol: 18mg
- Sodium: 40mg
- Total Carbohydrates: 16g
- Dietary Fiber: 1g
- Sugars: 10g
- Protein: 1g